안녕하세요.
자율주행 자동차 인기로 많이 듣게 된 라이다 센서를 테스트해 보았습니다. 360도 회전하며 값을 얻어오는 제품은 아니고 보급형 형태로 나온 한 점을 거리를 가져오는 제품으로 테스트하였습니다.
1. 라이다(Light Detection And Ranging, LiDAR) 란?
라이다는 주변의 사물을 인식하기 위해 레이저 신호를 이용하는 기술입니다. 라이다에서 쏘아진 펄스 레이저 신호가 주변의 사물과 부딪힌 후 되돌아오면, 이를 분석해 사물의 위치나 운동 방향, 속도 등을 확인하는 방식입니다.

Wikipidia 자료
LiDAR는 널리 알려진 신기술로 자율주행, 스마트 교통 시스템 등의 산업에 널리 사용되고 있습니다. 그리고 라이다의 기술 종류가 하나만 있는 것이 아니라 여러 가지 종류로 나눠져 있습니다.
2. TFmini Plus 스펙
Benewake의 TF mini Plus는 단거리 LiDAR 센서로 합리적인 가격으로 물체의 거리를 최대 0.1m에서 최대 12m까지 측정이 가능합니다. 주파수는 1Hz에서 1000Hz까지 조절이 가능하기 때문에 필요한 만큼, 효율적으로 전력을 관리할 수 있습니다.
- 방수 : IP65
- 무게 : 11g
- 사이즈 : 35x21x18.5mm
- 출력 형식 : UART, I2C
3. 연결하기
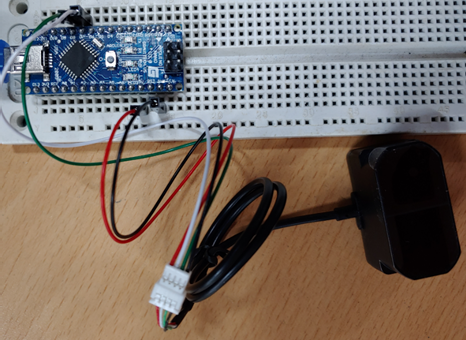
제품에서 바로 연결된 커넥터 경우 작아서 다른 곳에 연결할 수가 없습니다. 추가로 주는 연장 케이블을 연결할 경우 헤더 핀 타입으로 되어 있어서 기존 브레드보드나 소켓에 연결이 가능합니다.
UART 제품을 구매했기 때문에 4가닥의 선으로 연결했습니다.
아두이노 나노와 TFmini Plus와 통신하기 위해서는 시리얼 포트가 필요합니다. 아두이노 나노의 물리적 포트는 시리얼 데이터를 화면 출력에 사용하고 TFmini와 통신하기 위해서 하나가 더 시리얼 통신이 필요한데 이것은 소프트웨어 시리얼 포트를 사용하였습니다. 그래서 아두이노 나노의 Pin8(RX)와 Pin7(TX)을 연결하였습니다.
- 5V에 Red선,
- GND에 Black선,
- Pin8에 Blue(Green) 선
- Pin7을 White선과 연결합니다.
4. 소스 확인
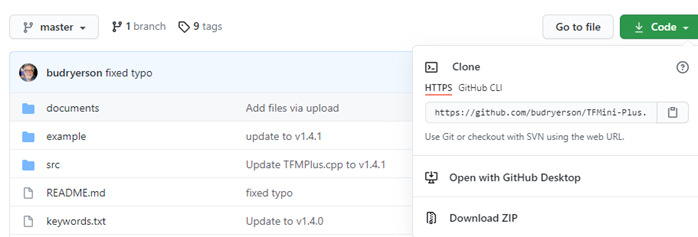
DIY메카 솔루션 오픈랩 소스를 쉽게 사용하면 되지만 github에 있는 소스를 조금 수정해서 사용했습니다.
우선 아래 링크로 가서 다운로드 주소를 복사해서 git 클론을 사용해서 다운로드하는 방법이 있고, Download ZIP으로 해서 간단하게 받는 방법 중 편한 방법으로 소스를 다운로드합니다.
https://github.com/budryerson/TFMini-Plus
example 폴더에서 TFMP-example.ino 파일을 열면 새로운 프로젝트 폴더가 필요하다고 하며 TFMP_example 폴더 만들어지며 파일이 폴더 안으로 이동합니다.
정식적으로 하면 라이브러리 파일(printf.h, TFMPlus.h, TFMPlus.cpp)을 라이브러리 경로에 넣어주어야 하는데 빠르게 테스트하기 위해서 하나의 폴더에 다 넣었습니다.

그러면 컴파일 시 TFMP-example.ino 파일에서 헤더 파일 없다고 에러가 발생합니다.
<TFMPlus.h>로 된 것을 "TFMPlus.h"로 바꿔서 소스가 있는 경로에서 라이브러리 파일을 검색하라는 의미로 바꿔줍니다. 그리고 TFMPlus.cpp 에도 동일하게 바꿔주어야 합니다.

헥사 값으로 나오는 부분이 있는데 주석 처리해서 거리만 나오도록 하였습니다.
//tfmP.printFrame();
#include "TFMPlus.h"  // Include TFMini Plus Library v1.4.1
TFMPlus tfmP;         // Create a TFMini Plus object

#include "printf.h"   // Modified to support Intel based Arduino
                      // devices such as the Galileo. Download from:
                      // https://github.com/spaniakos/AES/blob/master/printf.h

// The Software Serial library is an alternative for devices that
// have only one hardware serial port. Delete the comment slashes
// on lines 37 and 38 to invoke the library, and be sure to choose
// the correct RX and TX pins: pins 10 and 11 in this example. Then
// in the 'setup' section, change the name of the hardware 'Serial2'
// port to match the name of your software serial port, such as:
// 'mySerial.begin(115200); etc.

#include <SoftwareSerial.h>
//SoftwareSerial mySerial( 10, 11);
SoftwareSerial mySerial( 8, 7);

void setup()
{
    Serial.begin( 115200);   // Intialize terminal serial port
    delay(20);               // Give port time to initalize
    printf_begin();          // Initialize printf.
    printf("\r\nTFMPlus Library Example - 18JUN2020\r\n");  // say 'hello'

    mySerial.begin( 115200);  // Initialize TFMPLus device serial port.
    delay(20);               // Give port time to initalize
    tfmP.begin(&mySerial);   // Initialize device library object and...
                             // pass device serial port to the object.

    // Send some example commands to the TFMini-Plus
    // - - Perform a system reset - - - - - - - - - - -
    printf( "System reset: ");
    if( tfmP.sendCommand( SYSTEM_RESET, 0))
    {
        printf( "passed.\r\n");
    }
    else tfmP.printReply();

    delay(500);  // added to allow the System Rest enough time to complete

  // - - Display the firmware version - - - - - - - - -
    printf( "Firmware version: ");
    if( tfmP.sendCommand( OBTAIN_FIRMWARE_VERSION, 0))
    {
        printf( "%1u.", tfmP.version[ 0]); // print three single numbers
        printf( "%1u.", tfmP.version[ 1]); // each separated by a dot
        printf( "%1u\r\n", tfmP.version[ 2]);
    }
    else tfmP.printReply();
    // - - Set the data frame-rate to 20Hz - - - - - - - -
    printf( "Data-Frame rate: ");
    if( tfmP.sendCommand( SET_FRAME_RATE, FRAME_20))
    {
        printf( "%2uHz.\r\n", FRAME_20);
    }
    else tfmP.printReply();
    // - - - - - - - - - - - - - - - - - - - - - - - -

    delay(500);            // And wait for half a second.
}

// Initialize variables
int16_t tfDist = 0;    // Distance to object in centimeters
int16_t tfFlux = 0;    // Strength or quality of return signal
int16_t tfTemp = 0;    // Internal temperature of Lidar sensor chip

// Use the 'getData' function to pass back device data.
void loop()
{
    delay(50);   // Loop delay to match the 20Hz data frame rate

    if( tfmP.getData( tfDist, tfFlux, tfTemp)) // Get data from the device.
    {
      printf( "Dist:%04icm ", tfDist);   // display distance,
      printf( "Flux:%05i ",   tfFlux);   // display signal strength/quality,
      printf( "Temp:%2i\°C",  tfTemp);   // display temperature,
      printf( "\r\n");                   // end-of-line.
    }
    else                  // If the command fails...
    {
      //tfmP.printFrame();  // display the error and HEX dataa
    }
}
- 하나에 폴더에 합쳐 놓은 파일 압축
5. 동작확인
손바닥을 위아래로 놓고 높이를 측정해 보고 물 넣은 플라스틱 컵, 빈 플라스틱 컵으로 테스트해 보았습니다.
기본 10cm 미터부터 시작하는 것을 권장하는데, 테스트 삼아 0 ~ 20cm으로 해보았습니다. 벽, 손바닥 같은 반사가 가능한 물체는 거리측정이 잘되었습니다. 그런데 물이 든 컵과 투명한 상태의 플라스틱 컵에서는 정확한 거리 값을 받을 수 없었습니다.
6. 참고 사항
정확한 거리측정을 위해 최소 점(Spot)의 크기가 필요한데 거리마다 어느 정도 영역이 필요한지 데이터 시트에 표시하고 있습니다.
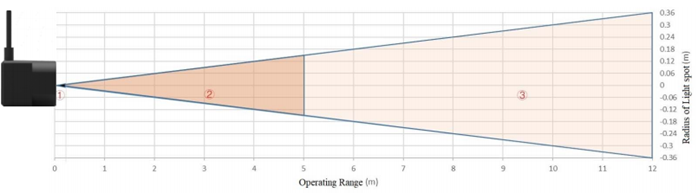

궁금한 것 중 하나가 측정영역에서 거리가 다른 물체가 겹쳐 있을 때는 어떻게 될까 궁금했는데 그 부분도 알려주고 있습니다. 해석이 맞는지 모르겠는데, 두 개 물체 사이의 실제값을 준다고 이해를 했습니다.
거리측정이 10cm, 15cm가 되었다면 12.5cm로 준다고 이해했는데, 제가 잘못 이해한 것이라면 답글 부탁드립니다. 추가로 정확한 값을 측정하고자 한다면 이런 상황을 피해야 한다고 합니다.
If the light spot reaches two objects with different distances, as shown in Figure 3, the output distance value will be a value between the actual distance values of the two objects.
감사합니다.
<참고 사이트>
1. 라이다란?
2. Lidar
https://en.wikipedia.org/wiki/Lidar
3. 라이다 기술 및 시장 동향 VOL. 54, 2017.11, 연구성과실용화진흥원
4. 라이다 기술 및 시장 동향 2016. 9. 28, 주간 기술동향
5. TFMini-Plus 소스
https://github.com/budryerson/TFMini-Plus
6. TFmini Plus LiDAR 아두이노에서 라이다(라이더)를 사용해보자!
https://blog.naver.com/roboholic84/221740028135
'Embedded > Arduino' 카테고리의 다른 글
| 아두이노 나노(NANO) 정품과 아두이노 카피품 비교 및 업로드 차이 (0) | 2024.05.25 |
|---|---|
| 아두이노 waveshare 1.3인치 OLED에 넣을 BMP 이미지(HEX 값) 만들고 출력하기 (0) | 2024.05.22 |
| 아두이노 나노(Arduino Nano)로 EXSEN CO2 Sensor(RX-9) 테스트 (0) | 2024.05.08 |
| 아두이노 나노(Arduino Nano)로 솔레노이드(Solenoid) DS-0630S [SZH-GNP529] 테스트 (0) | 2024.04.30 |
| 아두이노를 이용한 가스센서 9종 테스트 (Gas Sensor Kit) (0) | 2024.04.25 |