안녕하세요.
이전 내용에서 간단하게 LED를 제어해 보았습니다. 이번에는 나노 33 IoT 장착되어 있는 자이로 센서를 X, Y, Z 축 값을 가져와 BLE로 전달하는 것을 해보도록 하겠습니다.
1. BLE 구조
BLE 서비스를 만들고 Characteristic을 선언하는데, 조금이나 이해를 하면 좋지 않을까 해서 찾아보았습니다.
애플리케이션 단에서 데이터 교환은 ATT(Attribute protocol) 기반으로 이루어지고 각각의 데이터는 GATT(Generic Attribute Profile) 데이터 구조를 따라 정의됩니다.
ATT는 서버와 클라이언트 사이의 데이터 교환에 대한 규칙을 정의하는 것입니다.
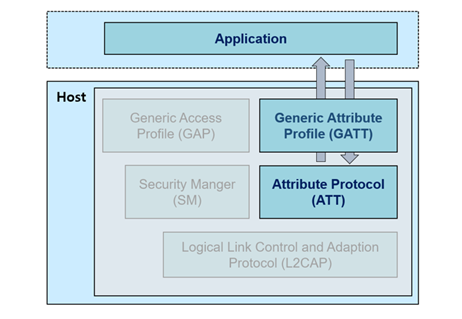
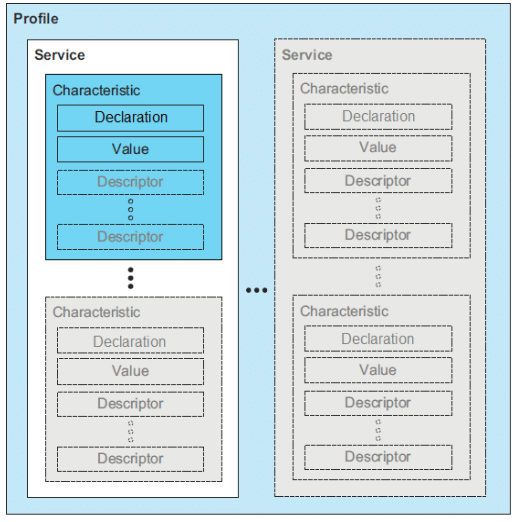
GATT는 Service와 Characteristic으로 구성됩니다.
“Service is a collection of information, and Characteristic is a set of actual values and information”
Service는 정보의 집합이고, Characteristic은 실제 데이터(각각 데이터)로 집합이라고 합니다.
(참고 : https://enidanny.github.io/ble/ble-att-gatt/)
2. 아두이노 프로그램 작성
새로운 파일을 열어서 BLE 서비스를 만들고 자이로스코프 센서 데이터를 전송하는 코드를 작성합니다.
우선 BLE와 Gyroscope Sensor 라이브러리를 불러옵니다.
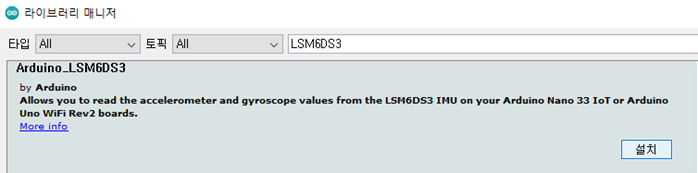
만약 LSM6DS3.h 파일이 없다고 에러가 나온다면, Arduino IDE에 공식 라이브러리를 설치하면 됩니다.
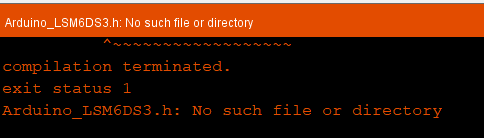
Tools-> Manage Libraries... 메뉴로 이동하여 라이브러리 관리자에서 Arduino_LSM6DS3로 검색하여 설치합니다.
#include <ArduinoBLE.h>
#include <Arduino_LSM6DS3.h>
BLE 서비스와 정보를 담을 BLE Charracteristic를 3개 만들어 줍니다. 그리고 3개의 값을 저장해 둘 3개의 변수를 만들어 줍니다. (UUID는 생성기로 생성해서 넣어주면 됩니다.)
BLEService sensorService("66df5109-edde-4f8a-a5e1-02e02a69cbd5");
BLEStringCharacteristic xSensorLevel("741c12b9-e13c-4992-8a5e-fce46dec0bff", BLERead | BLENotify,15);
BLEStringCharacteristic ySensorLevel("baad41b2-f12e-4322-9ba6-22cd9ce09832", BLERead | BLENotify,15);
BLEStringCharacteristic zSensorLevel("5748a25d-1834-4c68-a49b-81bf3aeb2e50", BLERead | BLENotify,15);

// last sensor data
float oldXLevel = 0;
float oldYLevel = 0;
float oldZLevel = 0;
long previousMillis = 0;
setup 함수에서 통신 설정과 자이로 센서, LED를 초기화해 줍니다. 그리고 시리얼통신이 연결될 때까지 대기하고, 자이로 센서, BLE 초기화를 실패하면 무한대기합니다.
void setup() {
 Serial.begin(115200);
 while (!Serial);
 if (!IMU.begin()) {
  Serial.println("Failed to initialize IMU!");
  while (1);
 }

 pinMode(LED_BUILTIN, OUTPUT);
 if (!BLE.begin()) {
  Serial.println("starting BLE failed!");
  while (1);
 }
BLE Service 이름과 Service 안에 BLE characteristics를 추가합니다.
 BLE.setLocalName("Gyroscope");
 BLE.setAdvertisedService(sensorService);
 sensorService.addCharacteristic(xSensorLevel);
 sensorService.addCharacteristic(ySensorLevel);
 sensorService.addCharacteristic(zSensorLevel);
 BLE.addService(sensorService);
writeValue() 함수로 BLE characteristics를 기본값으로 설정해 줍니다.
 xSensorLevel.writeValue(String(0));
 ySensorLevel.writeValue(String(0));
 zSensorLevel.writeValue(String(0));
advertise() 함수로 BLE Server를 시작합니다. 그러면 스마트폰(BLE Reader)이 인식할 수 있습니다.
 BLE.advertise();
 Serial.println("Bluetooth device active, waiting for connections...");
}
loop() 함수에서 스마트폰 연결을 기다립니다. 그리고 연결이 되면 스마트폰 BLE 주소를 출력하고 LED를 켜줍니다.
void loop() {
 BLEDevice central = BLE.central();
 if (central) {
  Serial.print("Connected to central: ");
  Serial.println(central.address());
  digitalWrite(LED_BUILTIN, HIGH);
스마트폰과 연결되면 BLEDevice 객체(central) 만들어지게 되고 연결이 끊어질 때까지 while() 함수 안에서 수행하게 됩니다.
루프 안에는 updateGyroscopeLevel() 함수가 있는데, 자이로 센서 데이터를 갱신해 주는 역할을 합니다.
 while (central.connected()) {
  //long currentMillis = millis();
  updateGyroscopeLevel();
  delay(300);
 }
연결이 끝나면 LED를 끄고 MAC 주소를 출력해 줍니다.
  digitalWrite(LED_BUILTIN, LOW);
  Serial.print("Disconnected from central: ");
  Serial.println(central.address());
 }
}
updateGyroscopeLevel 함수에서 IMU.readGyroscope() 함수를 통해서 값을 읽어옵니다. 그리고 IMU.gyroscopeAvailable() 함수를 통해 사용 가능한 값인지 확인합니다.
void updateGyroscopeLevel() {
 float x, y, z;
 if (IMU.gyroscopeAvailable()) {
 IMU.readGyroscope(x, y, z);
자이로 센서 데이터를 writeValue() 함수를 이용해서 BLE service 쪽으로 보냅니다. 그리고 그 값을 볼 수 있도록 시리얼 쪽으로 출력합니다.
 if (x != oldXLevel) {
  xSensorLevel.writeValue(String(x));
  oldXLevel = x;
 }

 if (y != oldYLevel) {
  ySensorLevel.writeValue(String(y));
  oldYLevel = y;
 }

 if (z != oldZLevel) {
  zSensorLevel.writeValue(String(z));
  oldZLevel = z;
 }

 Serial.print(x);
 Serial.print('\t');
 Serial.print(y);
 Serial.print('\t');
 Serial.println(z);
 }
}
프로그램을 다운로드하고 앱에서 데이터가 들어오는지 확인합니다.
3. 프로그램 테스트해 보기
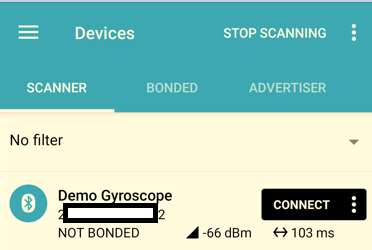
이전 내용처럼 nRF Connect 앱을 스캔합니다. 그러면 Demo Gyroscope라는 장치가 나타납니다. CONNECT 버튼을 눌러서 연결합니다.
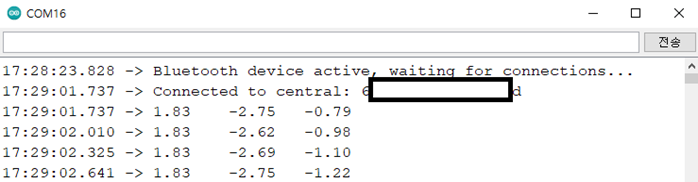
그러면 시리얼 모니터에 값이 나타나기 시작합니다.
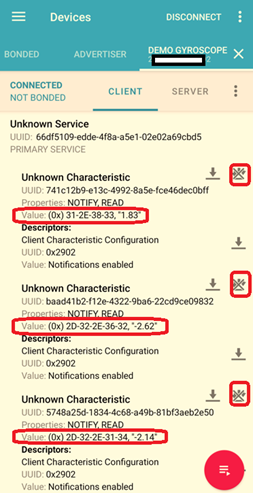
앱에서 Unkonwn Service 안에 있는 Unknown Characteristic 오른쪽에 Read 버튼을 누르면 실시간으로 변하는 X, Y, X 값을 볼 수 있습니다.
다음에는 안드로이드 앱에서 BLE로 전달되는 데이터를 보여줄 수 있는 간단한 안드로이드 앱을 만들어 보도록 하겠습니다.
감사합니다.
<참고 내용>
1. 1. Beginning Arduino Nano 33 IoT - Apress
2. BLE (3) - ATT/GATT 이해하기
https://enidanny.github.io/ble/ble-att-gatt/
'Embedded > Arduino' 카테고리의 다른 글
| 아두이노 나노(Arduino Nano) 33 IoT Web Server에서 데이터 JSON으로 출력하기 (0) | 2024.07.03 |
|---|---|
| 아두이노 나노(Arduino Nano) 33 IoT 고정 아이피(Static IP) 설정 방법 (0) | 2024.06.28 |
| 아두이노 나노(Arduino Nano 33 IoT) BLE를 이용한 LED 제어 – 2 (2) | 2024.06.19 |
| 아두이노 나노(Arduino Nano 33 IoT) BLE 사용하기 – 1 (연결하기) (0) | 2024.06.18 |
| 아두이노 나노(Arduino Nano) 33 IoT를 이용한 GY-GPSV3-7M GPS 수신 모듈 테스트(SZH-NT07) (4) | 2024.06.05 |