안녕하세요.
1. pigpio 테스트 이유
Raspberry Pi 4(Bookworm 64bit)에서 작은 프로젝트로 진행하기 위해서 WiringPi를 설치하려고 했는데 apt로 설치가 되지 않았습니다.
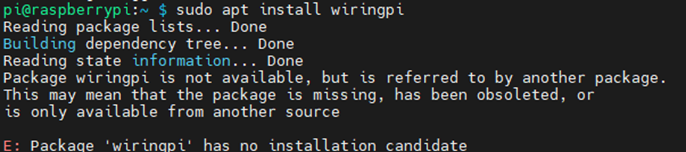
- 이유인 즉 개발자가 더 이상 지원하지 않고, 사이트까지 접속되지 않게 내려버렸기 때문입니다. 그러나 기존에 사용했던 github에 소스가 남아 있었고, fork 해서 다른 개발자들이 사용하고 있었습니다.
- 대안으로 검색하다가 pigpio library가 있다는 것을 알게 되어 테스트하였습니다.
2. 간단한 pigpio 설명
- 라이브러리 사이트 내용을 가져왔습니다. pi 모든 버전이 된다고 했지만, pi 5는 아직 지원되지 않는다고 합니다.
pigpio is a library for the Raspberry which allows control of the General Purpose Input Outputs (GPIO). pigpio works on all versions of the Pi.
Features
hardware timed sampling and time-stamping of GPIO 0-31 every 5 us
hardware timed PWM on all of GPIO 0-31
hardware timed servo pulses on all of GPIO 0-31
callbacks on GPIO 0-31 level change (time accurate to a few us)
notifications via pipe on GPIO 0-31 level change
callbacks at timed intervals
reading/writing all of the GPIO in a bank (0-31, 32-53) as a single operation
GPIO reading, writing, modes, and internal pulls
socket and pipe interfaces for the bulk of the functionality
waveforms to generate GPIO level changes (time accurate to a few us)
software serial links using any user GPIO
rudimentary permission control through the socket and pipe interfaces
creating and running scripts on the pigpio daemon
<원본 사이트 : https://abyz.me.uk/rpi/pigpio/>
3. pigpio 설치하기
- github에서 소스파일을 받아서 컴파일 후 설치하는 작업을 진행합니다.
pi@raspberrypi:~ $ mkdir opt
pi@raspberrypi:~ $ cd opt
pi@raspberrypi:~/opt $ wget https://github.com/joan2937/pigpio/archive/master.zip
pi@raspberrypi:~/opt $ unzip master.zip
pi@raspberrypi:~/opt $ cd pigpio-master
pi@raspberrypi:~/opt/pigpio-master $ make -j 4
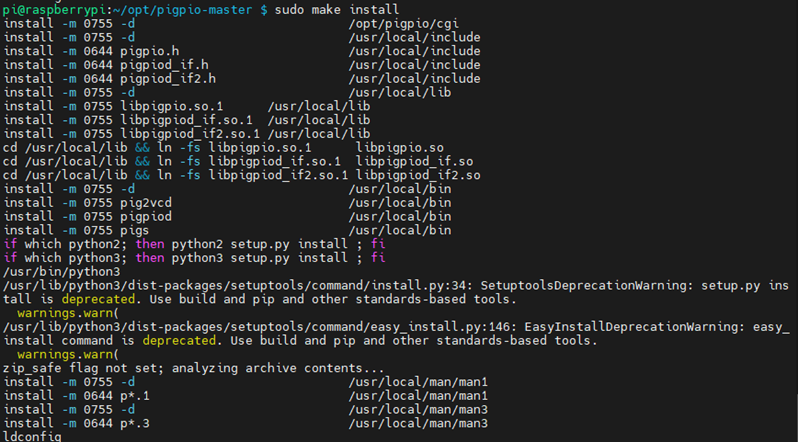
pi@raspberrypi:~/opt/pigpio-master $ make install
pi@raspberrypi:~ /opt $ sudo make install
- Python 설치 관련해서 에러가 발생했습니다. 설치 홈페이지에서는 추가 필요한 tools를 설치하라고 합니다. 그러나 현재 버전 OS에서는 python-setuptools 설치할 수 없다고 나오고, 설치되었다고 나왔습니다.
sudo apt install python-setuptools python3-setuptools
4. 배선하기
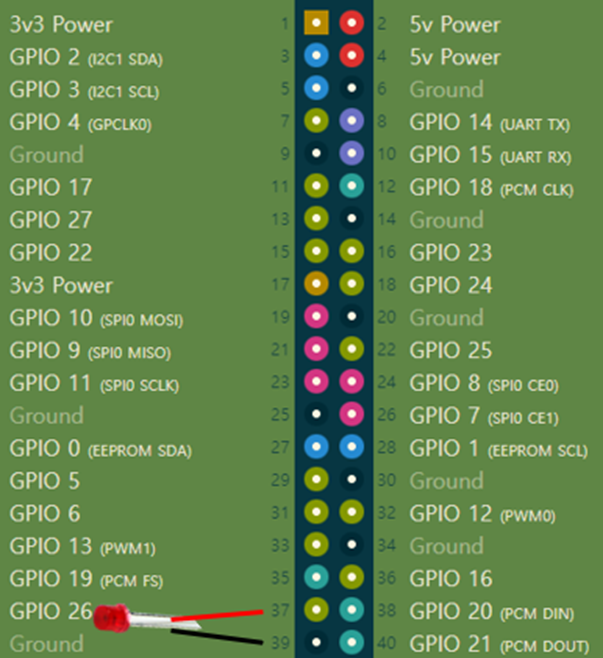
- pigpio는 핀맵을 GPIO 번호로 매핑시켜 놓았다고 생각하면 됩니다. 그래서 여기서 GPIO 26에 LED +를 연결하고 GND에 LED -를 연결합니다.
5. pigpio로 LED 제어해 보기
- pigpio library에 많은 기능이 있지만 간단하게 GPIO를 사용하는 방법을 확인 고자 하는 차원에서 간단하게 작성해 보았습니다. 추가로 해제까지 연동시키려고 하다 보니 Signal 함수가 추가되어 조금 길어지게 되었습니다. 참고로 봐주시면 좋을 것 같습니다.
pi@raspberrypi:~/opt/pigpio-master $ cd ..
pi@raspberrypi:~/opt $ mkdir pigpio_test
pi@raspberrypi:~/opt/pigpio_test/ $ vim led.c
- pigpio.h 헤더파일을 추가하여 gpioInitialise() 함수로 포트를 초기화 및 이상을 검사합니다.
- 기존의 함수 핸들러를 살려두기 위해서 함수 포인터 변수(oldHandler)를 선언해 줍니다.
- Ctrl + C 가 입력되었을 때 pigpio 관련 메모리등 해제 해주고 종료하는 함수를 정의합니다.
- Ctrl + C 신호를 콜백함수(sig_handler)와 연결시켜 줍니다. 그리고 기존 핸들 주소를 저장해 놓습니다.
- GPIO 26 Pin(LED)를 출력모드(0)로 만들어 줍니다.
- 무한루프 안에서 LED의 출력을 1, 0으로 변경해 줍니다. delay는 us 단위로 되어 있습니다. 그래서 원하는 시간을 계산하기 위해서 곱셈을 넣어 주었습니다. 1초를 계산하기 위해서 1,000,000를 곱하였습니다.
#include <pigpio.h>
#include <stdio.h>
#include <stdlib.h> //exit(0)
#include <signal.h>

char LED = 26;

void (*oldHandler)();

void sig_handler(int signo)
{
        gpioTerminate();
        signal(signo, oldHandler);
        printf("Ctrl + C key is pressed.\n exit\n");
        exit(0);
}

int main(void)
{
        if (gpioInitialise()<0) return 1;

        oldHandler = signal(SIGINT, (void *)sig_handler);
        gpioSetMode(LED,0) ;

        while(1)
        {
          gpioWrite(LED, 1) ;
          gpioDelay (1*1000000);
          gpioWrite(LED, 0) ;
          gpioDelay (1*1000000);
        }
}
- 컴파일을 할 때 옵션으로 pthread와 pigpio library를 추가해 줍니다. 특별한 에러가 발생하지 않았다면 led 실행파일이 만들어집니다. led 파일을 시킵니다. 종료할 때는 Ctrl + C를 누릅니다.
pi@raspberrypi:~/opt/pigpio_test/ $ gcc -o led led.c -lpigpio -lpthread
pi@raspberrypi:~/opt/pigpio_test/ $ sudo ./led

- LED가 1초 주기로 깜박이는 것을 확인할 수 있습니다.

감사합니다.
<참고사이트>
1. C) 라즈베리파이 시그널 처리
2. Linux - 시그널 Signal (Ctrl+c, Ctrl+z)
3. signal() function
https://raspberry-projects.com/pi/programming-in-c/signal-handling/signal-function
'Embedded > RaspberryPI' 카테고리의 다른 글
| W5100S-EVB-Pico를 이용해서 MQTT 발행(Publish) 해보기 (0) | 2024.02.02 |
|---|---|
| Raspberry Pi 4(Bookworm)에서 WiringPi 설치해서 사용하기 (2) | 2024.01.22 |
| [MQTT] Raspberry Pi에서 Grafana Dashboard 생성해 보기 (0) | 2024.01.11 |
| [MQTT] Raspberry Pi에서 Node-RED FLOW 생성하기 2 (influxDB 연결) (0) | 2024.01.09 |
| [MQTT] Raspberry Pi에서 Node-RED FLOW 생성하기 1 (Mosquitto 연결) (0) | 2024.01.06 |