안녕하세요.
프레임 저장 기능까지 했다면 이제는 영상에서 움직임이 발생하면 감지하고 감지되었을 때 녹화까지 하는 기능을 추가해 보겠습니다. 여기서 감지는 OpenCV에서 제공해 주는 함수로 진행할 예정입니다.
1. 구현 방법
보통 모션 감지는 background와 foreground 이미지를 segmentation(영상 분할) 해서 사용합니다. 그렇기 때문에 우리가 예측할 수 있는 것은 카메라의 background 이미지는 정적일 것이고, 프레임의 변화가 없을 것입니다. 그리고, 연속적인 foreground 프레임을 추출하고 그 속에서 물체들을 찾아내는 방식을 이용합니다.
그러나 이러한 추측은 현실에는 힘들 수 있습니다. 왜냐하면 태양이 뜨고, 지고, 그림자가 나타나는 부분도 감지가 되기 때문입니다. 상용제품으로 개발한다면 이런 부분들을 보완해야 하는 부분입니다.
이번 구현은 단순한 기능이고 실내에서 안정된 빛이 있다는 전제에서 만들어진 코드입니다.
OpenCV의 Video 모듈에 보면 배경화면을 제거할 수 있는 알고리즘을 제공하고 있습니다. 그중에 우리는 한 가지를 선택(BackgroundSubtractorMOG2)해서 사용해 볼 것입니다.

2. capture_thread.h 코드 추가
- 모션 감지 사용 중인 상태와 감지가 되었는지 상태를 알려주는 변수를 추가해 주고, 모션 감지에 필요한 변수를 생성합니다.
- 헤더파일에서 소스코드도 추가 가능합니다. 그래서 모션 감지 초기 설정하는 내용이 들어 있습니다. 사실, 간단한 코드는 inline 함수로 처리하기도 합니다.
public:
         // ...
         void setMotionDetectingStatus(bool status) {
             motion_detecting_status = status;
             motion_detected = false;
             if(video_saving_status != STOPPED) video_saving_status = STOPPING;
         };
         // ...
     private:
         void motionDetect(cv::Mat &frame);
         // ...
     private:
         // ...
         // motion analysis
         bool motion_detecting_status;
         bool motion_detected;
         cv::Ptr<cv::BackgroundSubtractorMOG2> segmentor;
- 헤더 부분에 std::vector를 사용하기 위해서 네임스페이스를 추가해 줍니다.
using namespace std;
3. capture_thread.cpp 코드 추가
- 스레드 생성자 함수에서 감지 상태를 false로 만듭니다.
motion_detecting_status = false;
- run() 함수 내에서, 카메라 open 된 상태에서 배경 제거 알고리즘을 적용합니다. 배경 제거 함수
createBackgroundSubtractorMOG2(500, 16, true);는 이동 평균을 이용해서 배경을 지속적으로 update 하는 방식이며, 첫 번째 인자(history) : 과거 몇 개의 프레임을 배경으로 이용한 것인지에 대한 인자, 히스토리 길이, 기본값은 500입니다.
두 번째 인자(varThreshold) : 픽셀과 모델 사이의 마할라노비스 거리(Mahalanobis distance) 제곱에 대한 임계값. 해당 픽셀이 배경 모델에 의해 잘 표현되는 지를 판단. 기본값은 16입니다. 세 번째 인자(detecShadows) : 그림자 검출 여부. 기본값은 True입니다.
segmentor = cv::createBackgroundSubtractorMOG2(500, 16, true);
- run() 함수 내에 while() 안에 감지 옵션을 선택 여부에 따라 모션을 감지하는 함수를 호출하게 합니다. 그리고 감지된 프레임을 전달하여 녹화를 시킵니다.
if(motion_detecting_status) {
     motionDetect(tmp_frame);
}
- motionDection() 함수를 구현합니다. 간단하게 로직을 설명하면, foreground 이미지를 저장할 수 있는 Mat 객체를 하나를 생성합니다. 그리고 segmentor로 배경을 제거한 후 foreground mask를 만듭니다. grayscale 된 foreground mask를 이용해서 노이즈를 제거하고 우리가 관심 있어하는 물체를 강조합니다.
void CaptureThread::motionDetect(cv::Mat &frame) {
    cv::Mat fgmask;
    segmentor->apply(frame, fgmask);
    if (fgmask.empty()) {
         return;
    }
...
}
- 노이즈를 제거한 후, findContours 함수를 이용해서 foreground mask에서 객체들의 윤곽(contours)을 알아낼 수 있습니다. 여기서 vector는 동적 배열(dynamic array) 작업을 더 안전하고 쉽게 해주는 역할을 합니다. QVector와 다른 것이니 사용에 주의가 필요합니다.
	cv::threshold(fgmask, fgmask, 25, 255, cv::THRESH_BINARY);

    int noise_size = 9;
    cv::Mat kernel = cv::getStructuringElement(cv::MORPH_RECT, cv::Size(noise_size, noise_size));
    cv::erode(fgmask, fgmask, kernel);
    kernel = cv::getStructuringElement(cv::MORPH_RECT, cv::Size(noise_size, noise_size));
    cv::dilate(fgmask, fgmask, kernel, cv::Point(-1,-1), 3);

	vector<vector<cv::Point> > contours;
    cv::findContours(fgmask, contours, cv::RETR_TREE, cv::CHAIN_APPROX_SIMPLE);
- 움직이는 물체의 윤곽이 나타난다면 영상을 녹화를 시작합니다. 그리고 화면에 윤곽의 좌표를 화면에 빨간색 사각형으로 그려줍니다.
 bool has_motion = contours.size() > 0;
 if(!motion_detected && has_motion) {
 	motion_detected = true;
    setVideoSavingStatus(STARTING);
    qDebug() << "new motion detected, should send a notification.";
} else if (motion_detected && !has_motion) {
	motion_detected = false;
    setVideoSavingStatus(STOPPING);
    qDebug() << "detected motion disappeared.";
}

 cv::Scalar color = cv::Scalar(0, 0, 255); // red
 for(size_t i = 0; i < contours.size(); i++) {
     cv::Rect rect = cv::boundingRect(contours[i]);
     cv::rectangle(frame, rect, color, 1);
 }
4. mainwindow.h 코드 추가
- UI 화면에서 체크박스와 연동을 하기 위해서 slots 영역에 함수 선언을 해줍니다.
private slots:
     // ...
     void updateMonitorStatus(int status);
5. mainwindow.cpp 코드 추가
- slots 함수를 구현해 줍니다. 모션 감지 체크박스 여부에 따라서 감지 로직이 작동과 레코드 버튼 활성화 여부를 실행해 줍니다.
void MainWindow::updateMonitorStatus(int status)
 {
     if(capturer == nullptr) {
         return;
     }
     if(status) {
         capturer->setMotionDetectingStatus(true);
         recordButton->setEnabled(false);
     } else {
         capturer->setMotionDetectingStatus(false);
         recordButton->setEnabled(true);
     }
 }
- initUI() 함수에서 체크박스와 updateMonitorStatus slot 함수를 연결시켜 줍니다.
connect(monitorCheckBox, SIGNAL(stateChanged(int)), this, SLOT(updateMonitorStatus(int)));
6. GazerW.pro 코드 추가
- createBackgroundSubtractorMOG2() 함수를 사용하려면 video 모듈을 추가해야 합니다. 기존 모듈 추가 부분에 하나 더 추가를 해줍니다.
"-lopencv_video453"
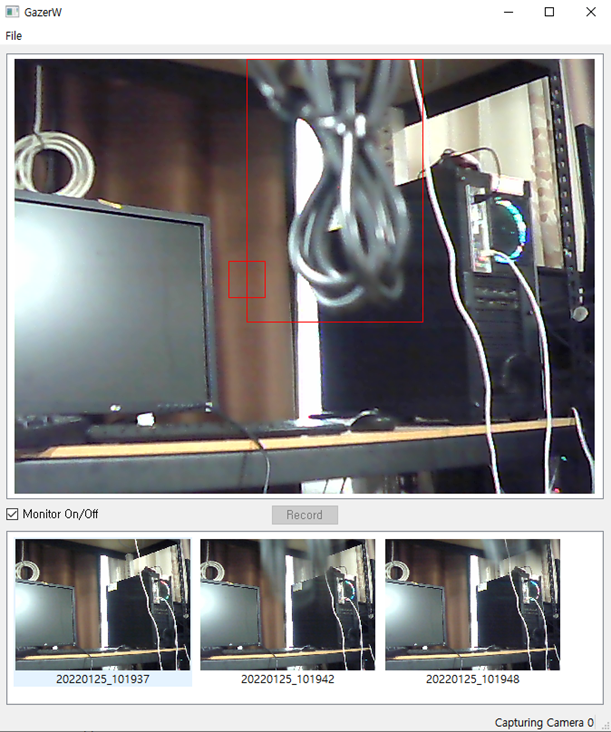
7. 모션 감지 테스트
- Camera Open 후 Monitor On/Off를 체크해 주면, 먼저 첫 번째 이미지가 저장이 되고 변화가 생기면 녹화가 시작되고 변화가 있는 부분은 사각 박스로 표시됩니다. 녹화 파일과 이미지가 저장되는 경로는 내PC\동영상\GazerW에 저장이 됩니다.
motionDetect() 함수 내에 Noise_size를 줄이게 되면 더 작은 이미지를 노이즈 처리가 되어서 실제적인 감지가 되지 않을 수 있습니다. 그래서 적절한 수치를 넣어주면 상황에 맞게 사용할 수 있습니다.
감사합니다.
<참고 사이트>
1. [BOOK] Qt-5-and-OpenCV-4-Computer-Vision-Projects
2. C++ 07.22 - std::vector 소개
https://boycoding.tistory.com/214
3. 06-3. Background Subtraction
https://leechamin.tistory.com/342
4. cv::BackgroundSubtractor Class Reference
https://docs.opencv.org/4.x/d7/df6/classcv_1_1BackgroundSubtractor.html
5. 영상의 객체 추적 - 배경 차분 - MOG 배경 모델
https://deep-learning-study.tistory.com/274
6. Segment background using Computer Vision
http://layer0.authentise.com/segment-background-using-computer-vision.html