안녕하세요.
이번에는 대기압 측정하는 BMP180 센서를 테스트해 보았습니다. 사실 거리측정 센서를 통해서 높이를 측정 가능할 거라고 생각했는데 기압으로도 높이를 측정해서 고도로 표시된다고 해서 실생활에서도 가능할지 한번 확인해 보았습니다.
1. 기압 센서란?
기압계라고 하면, 공기의 무게에 의해 생긴 압력을 기압이라고 하고 기압은 해수면을 기준으로 고도가 변하므로 고도를 측정하는데도 기압 센서로 사용하기도 합니다. 기입 센서를 정의한 것을 확인해 보면,
기압 센서란 대기의 압력을 검지하는 센서입니다. 압력 센서에는 측정하는 압력차 등에 따라 하기와 같은 다양한 재료 및 방식의 센서가 존재합니다. 이러한 압력 센서 중, 대기압을 검지 (기압 검지 목적)하는 센서를 일반적으로 기압 센서라고 부릅니다. 기압 센서의 대표적인 방식은 실리콘 (Si) 반도체를 사용한 피에조 저항 방식입니다.

- 피에조 저항 방식의 기압 센서
피에조 저항 방식의 압력 센서는 Si 단결정판을 다이어프램 (수압 소자)으로 하여, 그 표면에 불순물을 확산시켜 저항 브리지 회로를 형성, 압력이 가해졌을 때의 저항 브리지의 변형을 저항치 변화로 검출하여, 압력 (기압)을 산출합니다.
이 저항이 가해진 압력에 따라 저항률 (전기 도전율)이 변화하는 현상을 피에조 저항 효과라고 부릅니다. 기압 센서 IC는 이 피에조 저항식 수압 소자와 온도 보정 처리, 제어 회로 등을 포함한 집적 회로를 패키지화하여, 고정밀도 기압 정보를 간단히 취득할 수 있습니다.
- 로움(ROHM) 자료-
2. BMP180 스펙
- size: 13mm x 10mm
- 1.8V to 3.6V Supply Voltage
- Max I2C Speed: 3.5Mhz
- Low power consumption: 0.5uA at 1Hz
- Very low noise: up to 0.02hPa (17cm) Full calibrated
- Pressure Range: 300hPa to 1100hPa (+9000m to -500m)
3. 연결하기
- GY-68(BMP180) 모듈에 I2C Pull-up 저항도 장착되어 있어서 특별히 구성할 것 없이 4핀 I2C 연결만 해주면 됩니다.
| 아두이노 나노 핀 | GY-68(BMP180) 핀 |
| 3.3V | VIN |
| GND | GND |
| A4 | SDA |
| A5 | SCL |
4. 소스 확인하기
- BMP180 소스에 OLED를 붙여서 사용하신 분의 것도 있는데(하단 참조사이트 참고) , 기본 제공해 주는 시리얼 데이터 출력 샘플 소스를 확인해 보았습니다. 그리고 adafruit사와 sparkfun사 예제가 나눠 확인해 보았습니다.
1) adafruit 예제 소스 확인
- 예제를 확인하려면 우선 "툴(Tool)->라이브러리 매니저"로 이동해서 bmp180을 검색합니다. 그러면
"Adafruit BMP085 Library"가 나타납니다. 그리고 설치를 누릅니다. (085 버전과 호환이 된다고 하니 이것을 사용해도 무리가 없어 보입니다.)

- "파일-> 예제-> Adafruit BMP085 Library->BMP085 test" 실행시키면 예제 파일이 나타납니다.
- 그냥 소스를 업로드해도 되지만 좀 더 정확히 하려면
Serial.print(bmp.readAltitude(101500)); 소스 부분에 "해면기압"을 넣어주면 됩니다. 그러면 어디서 해면기압 값을 가져오느냐 하면, 직접 측정하면 좋겠지만, 기상청 홈페이지에 들어가면 지역별로 나오는 값들이 있습니다.
이 값을 대입하면 조금이나 정확하지 않을까 합니다. 기상청에 나온 해면기압(mbar)에 x100을 하면 Pascals 됩니다.
* 1 hPa = 100 Pa = 1mbar
<기상청 해면기압 확인하는 링크>
https://www.weather.go.kr/weather/observation/aws_table_popup.jsp
#include <Adafruit_BMP085.h>

Adafruit_BMP085 bmp;

void setup() {
  Serial.begin(9600);
  if (!bmp.begin()) {
	Serial.println("Could not find a valid BMP085 sensor, check wiring!");
	while (1) {}
  }
}

void loop() {
    Serial.print("Temperature = ");
    Serial.print(bmp.readTemperature());
    Serial.println(" *C");

    Serial.print("Pressure = ");
    Serial.print(bmp.readPressure());
    Serial.println(" Pa");

    // Calculate altitude assuming 'standard' barometric
    // pressure of 1013.25 millibar = 101325 Pascal
    Serial.print("Altitude = ");
    Serial.print(bmp.readAltitude());
    Serial.println(" meters");

    Serial.print("Pressure at sealevel (calculated) = ");
    Serial.print(bmp.readSealevelPressure());
    Serial.println(" Pa");

  // you can get a more precise measurement of altitude
  // if you know the current sea level pressure which will
  // vary with weather and such. If it is 1015 millibars
  // that is equal to 101500 Pascals.
    Serial.print("Real altitude = ");
    Serial.print(bmp.readAltitude(102890));
    Serial.println(" meters");

    Serial.println();
    delay(500);
}
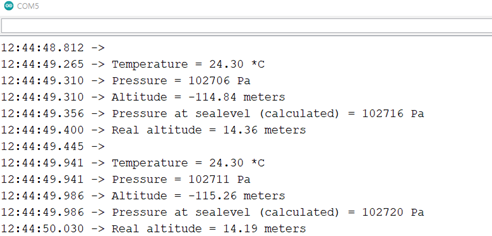
- 업로드하면 아래와 같이 결과를 볼 수 있습니다.
2) sparkfun 예제 소스 확인
- 우선 라이브러리 소스를 아래 링크에서 다운로드합니다.
https://github.com/sparkfun/BMP180_Breakout_Arduino_Library/archive/master.zip
- 링크 소스를 그냥 컴파일하면 #include <SFE_BMP180.h> 파일을 찾을 수 없다고 에러가 발생합니다.
그래서 다운로드한 압축파일을 아두이노 라이브러리가 있는 곳에 옮겨서 압축을 풀어줍니다.
예를 들면, C:\Users\계정 아이디\Documents\Arduino\libraries입니다.
그리고 SFE_BMP180_example 폴더로 들어가서 소스를 컴파일하면 문제없이 업로드됩니다.
소스 경로 예,
C:\Users\계정아이디\Documents\Arduino\libraries\BMP180_Breakout_Arduino_Library-master\examples\SFE_BMP180_example 폴더의 SFE_BMP180_example.ino
#include <SFE_BMP180.h>
#include <Wire.h>

// You will need to create an SFE_BMP180 object, here called "pressure":

SFE_BMP180 pressure;

#define ALTITUDE 1655.0 // Altitude of SparkFun's HQ in Boulder, CO. in meters

void setup()
{
  Serial.begin(9600);
  Serial.println("REBOOT");

  // Initialize the sensor (it is important to get calibration values stored on the device).

  if (pressure.begin())
    Serial.println("BMP180 init success");
  else
  {
    // Oops, something went wrong, this is usually a connection problem,
    // see the comments at the top of this sketch for the proper connections.

    Serial.println("BMP180 init fail\n\n");
    while(1); // Pause forever.
  }
}

void loop()
{
  char status;
  double T,P,p0,a;

  // Loop here getting pressure readings every 10 seconds.

  // If you want sea-level-compensated pressure, as used in weather reports,
  // you will need to know the altitude at which your measurements are taken.
  // We're using a constant called ALTITUDE in this sketch:

  Serial.println();
  Serial.print("provided altitude: ");
  Serial.print(ALTITUDE,0);
  Serial.print(" meters, ");
  Serial.print(ALTITUDE*3.28084,0);
  Serial.println(" feet");

  // If you want to measure altitude, and not pressure, you will instead need
  // to provide a known baseline pressure. This is shown at the end of the sketch.

  // You must first get a temperature measurement to perform a pressure reading.

  // Start a temperature measurement:
  // If request is successful, the number of ms to wait is returned.
  // If request is unsuccessful, 0 is returned.

  status = pressure.startTemperature();
  if (status != 0)
  {
    // Wait for the measurement to complete:
    delay(status);

    // Retrieve the completed temperature measurement:
    // Note that the measurement is stored in the variable T.
    // Function returns 1 if successful, 0 if failure.

    status = pressure.getTemperature(T);
    if (status != 0)
    {
      // Print out the measurement:
      Serial.print("temperature: ");
      Serial.print(T,2);
      Serial.print(" deg C, ");
      Serial.print((9.0/5.0)*T+32.0,2);
      Serial.println(" deg F");

      // Start a pressure measurement:
      // The parameter is the oversampling setting, from 0 to 3 (highest res, longest wait).
      // If request is successful, the number of ms to wait is returned.
      // If request is unsuccessful, 0 is returned.

      status = pressure.startPressure(3);
      if (status != 0)
      {
        // Wait for the measurement to complete:
        delay(status);

        // Retrieve the completed pressure measurement:
        // Note that the measurement is stored in the variable P.
        // Note also that the function requires the previous temperature measurement (T).
        // (If temperature is stable, you can do one temperature measurement for a number of pressure measurements.)
        // Function returns 1 if successful, 0 if failure.

        status = pressure.getPressure(P,T);
        if (status != 0)
        {
          // Print out the measurement:
          Serial.print("absolute pressure: ");
          Serial.print(P,2);
          Serial.print(" mb, ");
          Serial.print(P*0.0295333727,2);
          Serial.println(" inHg");

          // The pressure sensor returns abolute pressure, which varies with altitude.
          // To remove the effects of altitude, use the sealevel function and your current altitude.
          // This number is commonly used in weather reports.
          // Parameters: P = absolute pressure in mb, ALTITUDE = current altitude in m.
          // Result: p0 = sea-level compensated pressure in mb

          p0 = pressure.sealevel(P,ALTITUDE); // we're at 1655 meters (Boulder, CO)
          Serial.print("relative (sea-level) pressure: ");
          Serial.print(p0,2);
          Serial.print(" mb, ");
          Serial.print(p0*0.0295333727,2);
          Serial.println(" inHg");

          // On the other hand, if you want to determine your altitude from the pressure reading,
          // use the altitude function along with a baseline pressure (sea-level or other).
          // Parameters: P = absolute pressure in mb, p0 = baseline pressure in mb.
          // Result: a = altitude in m.

          a = pressure.altitude(P,p0);
          Serial.print("computed altitude: ");
          Serial.print(a,0);
          Serial.print(" meters, ");
          Serial.print(a*3.28084,0);
          Serial.println(" feet");
        }
        else Serial.println("error retrieving pressure measurement\n");
      }
      else Serial.println("error starting pressure measurement\n");
    }
    else Serial.println("error retrieving temperature measurement\n");
  }
  else Serial.println("error starting temperature measurement\n");

  delay(5000);  // Pause for 5 seconds.
}
- 이번 소스도 정확성을 높이려면 원본 소스 75번 줄 정도에 #define ALTITUDE 1655.0 값을 수정해 줍니다. sparkfun 소스에서는 해발 고도를 입력하도록 되어 있습니다.
테스트하는 곳의 해발고도를 찾으려면 기상청으로 들어가서 측정기계가 있는 위치로 할 수도 있고 구글맵을 이용할 수도 있습니다. 이번에는 구글 맵을 통해서 확인해 보겠습니다.
(고도 확인 사이트 : https://www.maps.ie/coordinates.html)
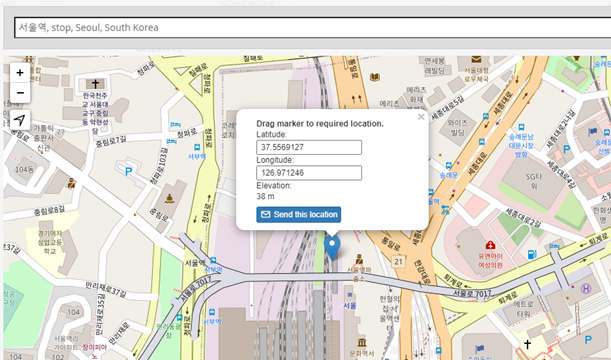
예를 들어, maps.ie 사이트에서 서울역의 해발고도를 확인해 보면 38m인 것을 확인할 수 있습니다. 자신의 주소가 검색이 되지 않는다면 인근 역을 먼저 검색하고 파란색 포인터를 자신의 테스트하는 곳으로 옮겨 정확한 고도 찾아 입력하면 됩니다.
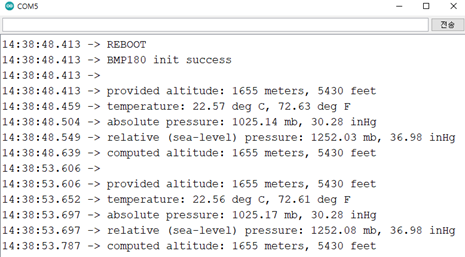
- 업로드하면 다음과 같이 출력됩니다.
5. 테스트 후기
- 온도 값은 변화가 대략 맞는 것 같은데, 기압과 고도는 정확하게 확인할 방법이 없고 오차가 1m가 나타난다고 하니 실내에서 테스트하기가 힘들어 보입니다. 그래서 이것을 가지고 단순히 높이를 잰다 하는 것은 힘들어 보입니다. 매번 변하는 해면 기압 혹은 해발고도를 찾아서 입력해 주어야도 하기 때문입니다.
- 간단하게 수치가 나오는 것은 소스로 테스트할 수 있었습니다. 그러나 나중에 OLED를 부착해서 외부 테스트를 해봐야 좀 더 정확한 것인지 알 수 있지 않을까 합니다.
감사합니다.
<참조 사이트>
1. BMP180 대기압 센서로 대기압과 온도 측정하기 [아두이노 강좌]
https://m.blog.naver.com/ubicomputing/220605041018
2. 기압 센서
https://www.rohm.co.kr/electronics-basics/sensors/sensor_what4
3. adafruit 사이트 소스
https://learn.adafruit.com/bmp085/using-the-bmp085
4. BMP180 Barometric Pressure Sensor Hookup
https://learn.sparkfun.com/tutorials/bmp180-barometric-pressure-sensor-hookup-
5. 기압 센서를 이용한 기압 및 온도 측정
https://raduino.tistory.com/26
6. GPS Coordinates on Google Maps (해발고도 찾는 곳)
'Embedded > Arduino' 카테고리의 다른 글
| 아두이노 나노를 이용한 압력센서 FSR (QA6P) 테스트 (4) | 2024.03.27 |
|---|---|
| Arduino MPU9250(MPU6050) FIFO overflow error 해결하기 (2) | 2024.03.24 |
| 아두이노 나노를 이용한 5V 수중 펌프 모터 제어(SZH-GNP155) (0) | 2024.03.20 |
| Arduino Nano + OSTSen-T007(TMP007) (MEMS) thermopile sensor Test (0) | 2024.03.17 |
| Arduino Nano + Crowtail-Capacitive Moisture (토양수분 센서) 테스트 (0) | 2024.03.09 |